

Wednesday, September 28, 2011
Clean and Simple for Stampin Royalty (again!)
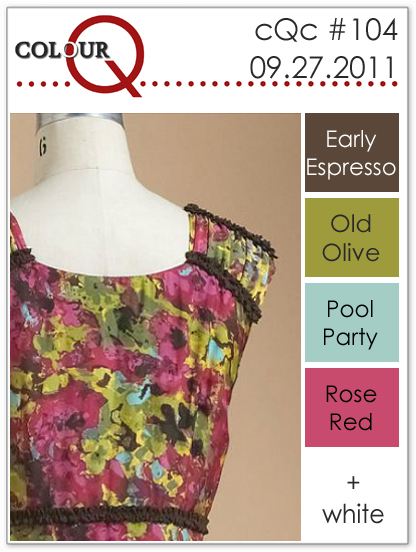
Tuesday, September 27, 2011
Keep it Simple for Stampin Royalty


Colour Q Challenge #104

This card was made for today's Colour Q Challenge. It's a fabulous colour challenge, but because it's Colour Q's 2year anniversary, we have the added challenge of using a prior Colour Queen as inspiration. I chose the Colour Queen for Challenge #58, Carrie Gaskin, the Artistic Avenger, my sideline, and fellow Vancouverite. Click here to check out her fabulous blog.
It's not easy to see where my inspiration came from, but I really like the layout of Carrie's Card. I struggled with how to add the butterflies so that they made sense. You don't often see butterflies in December. My card was also inspired by the fabulous Spice Cake DSP and Fabric. I used the scrap from some fabric I used with the Tasteful Trims Die for the Big Shot. The image was stamped with brown Staz0n on watercolouring paper. Then I used an Aquapainter and ink pads to watercolour in the image. I went over the girl's coat with a Stampin' Write marker to make the colour more bold. I added a bit of Rose Red as an accent colour and of course I sponged like crazy to add a roughed up feel.

Sunday, September 25, 2011
Clean and Simple Christmas

 Well this card was amazingly easy to make. It was designed by my upline Kari as a make-n-take last month. First the white cardstock was run through the Big Shot with the Snowflakes embossing folder. The Deer image is from Winter Post. It was stamped in Basic Grey and versamark and then covered in clear embossing powder and set with a heat gun. Then I used a two way glue pen and covered the snowflakes and then threw on some Dazzling Diamonds for a bit of sparkle!
 Saturday, September 24, 2011
Gratitude Spice Take 2

Thursday, September 22, 2011
Swaps by Di

Tuesday, September 20, 2011
Hybrid CASEing

Sunday, September 18, 2011
Established Swaps

Saturday, September 17, 2011
Convention Swaps

Friday, September 16, 2011
Convention Swaps

Wednesday, September 14, 2011
Sweets for Stampin' Royalty

This week at Stampin Royalty we have an inspiration challenge for you. Scroll down for the photo. Don't you just love these little cupcakes?? How cute are they? So for this card I decided to make a birthday card. The polka dots are from the Candy Cane Lane Digital set for My Digital Studio. I printed it out on Whisper White cardstock. The pink DSP is retired Regal Rose patterned paper. I really enjoyed putting this little card together and I can't wait to give it to a little girl.
Don't forget to hop on over to Stampin' Royalty to check out what the ladies have made!

Tuesday, September 13, 2011
Napping away with Colour Q

 I'ts Tuesday, so that means another fabulous colour combo over at Colour Q. When I found this adorable photo of my nephew after our day on the boat, I knew I had to scrap it. He was so cute when he fell asleep sitting up at the end of the day. That lifejacked really propped him up! He slept like that all the way home. This page was made using My Digital Studio of course. It's super easy to whip up a digital page. In order to make this fit the colour challenge, I had to make my own DSP. I used Basic Grey as my background, and then colour matched the stamps to the shadows. This way I came up with a darker shade of Basic Grey for a tone on tone effect. First, I stamped an overal from the Vintage Overlays set. Next I addedd in the nautical images from The Open Sea stamp brush set. Finally I added the title from Greatest Moments, and added the subtitle in a text box.
Monday, September 12, 2011
Vintage Christmas for Create with Connie and Mary

I am absolutely thrilled to announce that I have designed a fabulous project for Create with Connie and Mary.

The Christmas edition goes live September 18th and you can sign up for early bird pricing before then. Click here to go and sign up And if you sign up NOW, you will receive the Early Bird price of $29.95 (which is $5 off the regular subscription price).This little stocking card features the paper, fabrics, and stamps that I used for my project. Check below for more details about the card. I can't show you my project, but I can tell you that it's vintage, it's Christmas, and it's 3D. My project will be posted up on Week 6 which goes live on October 23rd.
The Fun Stuff:
Stamps: Pines and Pointsettias
Paper: Soft Suede, Pink Pirouette, Whisper White, Beau Cheateau
Ink: Very Vanilla Craft, Soft Suede, Crumb Cake Classic
Accessories: Vintage Wallpaper Textured Impressions Folder, 1 3/4" circle punch, Stocking Builder Punch, Pearls Basics, Beau Chateau Designer Series Fabric, Stampin' Dimensionals
Sunday, September 11, 2011
Gratitude Spice

Friday, September 9, 2011
Another fun card

Here is another card I made using My Digital Studio. This card is a direct copy of one by Teneale Williams. Click here to see her original card. I made this card using My Digital Studio because I don't own the actual stamps. One of the nice things about MDS is that you can line things up perfectly. The background of this card is made by 'stamping' the phrase stamp over and over again. Below you will find the MDS image that I created. I cut and trimmed and layered and sponged to come up with this card.

Wednesday, September 7, 2011
Stampin' Royalty Challenge #88


Tuesday, September 6, 2011
Colour Q Challenge #101

We have a fabulous colour challenge for you this week at Colour Q. Of course I absolutely had to join in this week, even though it's not really my week, but I just LOVE, LOVE, LOVE purple and green. So I whipped up this page of us at the PNE last week. Of course I used My Digital Studio. It's so easy to alter the photos to black and white, and use whatever colours you'd like for the page.

Sunday, September 4, 2011
Wow, what an evening...

So I have a little story for you. I finished up this cute little card tonight and was getting ready to post it, (challenge details at the bottom of this post) but with my photos taken of my card, I realized that my drink was empty, so I headed out to the carport, to get another Diet Coke. I got to the door and ran into this...
 So I ran back inside, and remembering my camera was around my neck from taking photos of my card, I snapped a few photos through the glass in the door. We live in an area that gets a lot of bears, so you may be wondering why we have a fridge full of food in our carport. Well, actually, the fridge is only full of drinks like Diet Coke, and Perrier.
 And we do have a plan to build a little shed in our carport in the next while. ( Now, Brad says we might be building that shed next week.) Anyway, I couldn't figure out what the bear was doing in the frigde, and then I remembered that we went to Costco today, and when we got home we were furriously getting ready for Teagan's princess party today, so to save time, a few things were tossed in the carport freezer until we had time to deal with them later today. Well...guess who forgot about the food in the freezer downstairs. So, now I'm thrilled to say that my shopping spree at Costco for next week's meals, has made for one very happy bear.
  He took the food and found a comfy seat on the lawn across the street. Check out the spooky eyes in the middle of the photo.
 Brad and I ran up to our bedroom and took a few photos from our bedroom window. Here he is coming back down our driveway...
 And here he is heading back into the carport for another course. He actually spent quite a while emptying out our freezer. We eventually realized that perhaps we should go empty our freezer when he was across the street muching away. So I ran lookout, as Brad went downstairs and emptied the freezer, I kept an eye on the bear from the upstairs window. On the last trip he realized that the freezer was empty, and wandered off towards the trail at the end of the street.
Oh, and back to the card. I made this card for two challenges. Firstly for the Monochromatic colour challenge over at Hand Stamped Sentiments. And also for the sketch challenge at Just Add Ink. I was totally inspired by the fabulous Teneale Williams, yet again.

Friday, September 2, 2011
Altered Baby Box


Today I have a cute little project to share. I found this little wooden box at a local craft store all roughed up and ready for some colour. I decided to try my hand at altering it. I pulled out my retired Nursery Suite DSP and went to work,. I struggled to cover over the letters, so I pried them off and die cut some out of chipboard with the Big Shot. I used a sponge and ink to cover over the actual parts of the box that were visible, but once they were inked up, the colour was too vibrant, so I decided to sponge over it with Very Vanilla Craft Ink which added a nice soft feel to the block. This little block opens up into a little keepsake box. This box is perfect for parents who don't know if they are expecting a little boy, or a little girl.
Subscribe to:
Posts (Atom)