

Thursday, June 30, 2011
Stampin Royalty Challenge #78
Saturday, June 25, 2011
An Announcement!!!
Wednesday, June 22, 2011
Stampin Royalty Challenge #77

 So this week we have an excellent sketch challenge at Stampin' Royalty. Click here to check out the fabulous creations by the SR Goddesses. For my card I pulled out some retiring paper and embellishments. I will miss these rosettes. The ribbon is also from a reitred Ribbon Originals that I purchased off the clearance rack a little while ago. Anyway, so the cardstock is glimmer gold. First I made the card and attached the DSP for the background. I stamped the flourish frame and the sentiment with Soft Suede ink and then carefully cut them out. Next I mounted them on dimensionals. I added some ribbon and pearls and voila! a wedding card is born.
Tuesday, June 21, 2011
Colour Q Challenge #90


Wednesday, June 15, 2011
Stampin Royalty Challenge #76

 This week at Stampin' Royalty we have an inspiration challenge for you. The challenge is to use the photo collage on the right for inspiration. Below you will find close up photos of my sample.
 Well I was so lucky to receive my preorder just as I was sitting down to figure out what to make. I really wanted to make a banner, to reflect the floral banner, and I wanted to pull out the delicate lines of the lacy 'flowers' on the bedspread. And in my preorder was the new Perfect Pennants die for the big shot. Putting this banner together was a cinch. I used the new die, and the Blossom Bouquet Triple Layer punch - currently available in the summer mini. I used Pink Pirouette, Pretty In Pink, Going Grey and Basic Grey. I pulled out Rhinestone Brads and Rhinestone Basic Jewels, plus some Taffeta Ribbon in coordinating colours. I used some retired chipboard letters and Craft Whisper White ink to add the finishing touch. Don't forget to hop on over to Stampin' Royalty to check out the fabulous work from the Stampin' Royalty Goddesses.

Sunday, June 12, 2011
Sending Springtime Smiles

Saturday, June 11, 2011
Almost Artisan

Friday, June 10, 2011
Enjoy the Little Things
 Well I've been really busy these past few days. I am absolutely IN LOVE with the new papers in the upcoming 2011/12 catty. I tried and tried and tried to get a good photo of this page, but I just couldn't get the colours to photograph properly. This page features a sneak peek of a new hostess paper - Cheerful Treat. The lace circles are cutouts from a new specialty paper called Flirtatious. I pulled the photo into My Digital Studio and then added the title before I printed it out. I just love this photo of my daughter. She has such a sparkle in her eyes in this photo.
 Thursday, June 9, 2011
Sneak Peek In Colours

Wednesday, June 8, 2011
Stampin Royalty Challenge #75

This page features a photo of me and my dad when we caught a 25 lb Salmon. I was 9 years old. We did it together on the waters of Howe Sound - just outside of Vancouver. I remember a lot about this day because Dad and I both rode the fish to the boat. You see, you need to really tire out a fish this big or it might break the line. You reel in the fish, and then let the line go free so the fish can swim away, then you reel it back in again. Well, I think I got tired before the fish did, so my Dad helped me. We had to run all over the boat with the rod as the fish darted in and around the boat trying to break free. It was really exciting and it took quite a while until we were able to reel it in. In the end, Dad brought the fish to the side of the boat and I used the net to catch it. I just about fell in the ocean when the fish fell in the net and started flipping around. It is my greatest memory with my Dad.
Anyway, back to the scrapbooking. I used My Digital Studio to make this page. I pulled out all the flower images that I could. I "stamped" each flower in Whisper White and then added a drop shadow in Marina Mist. It created this interesting layered look. I changed the colour photo to Sepia because we are wearing some scary 70's colours.
Tuesday, June 7, 2011
Colour Q Challenge #88


Saturday, June 4, 2011
Budding Bustier???
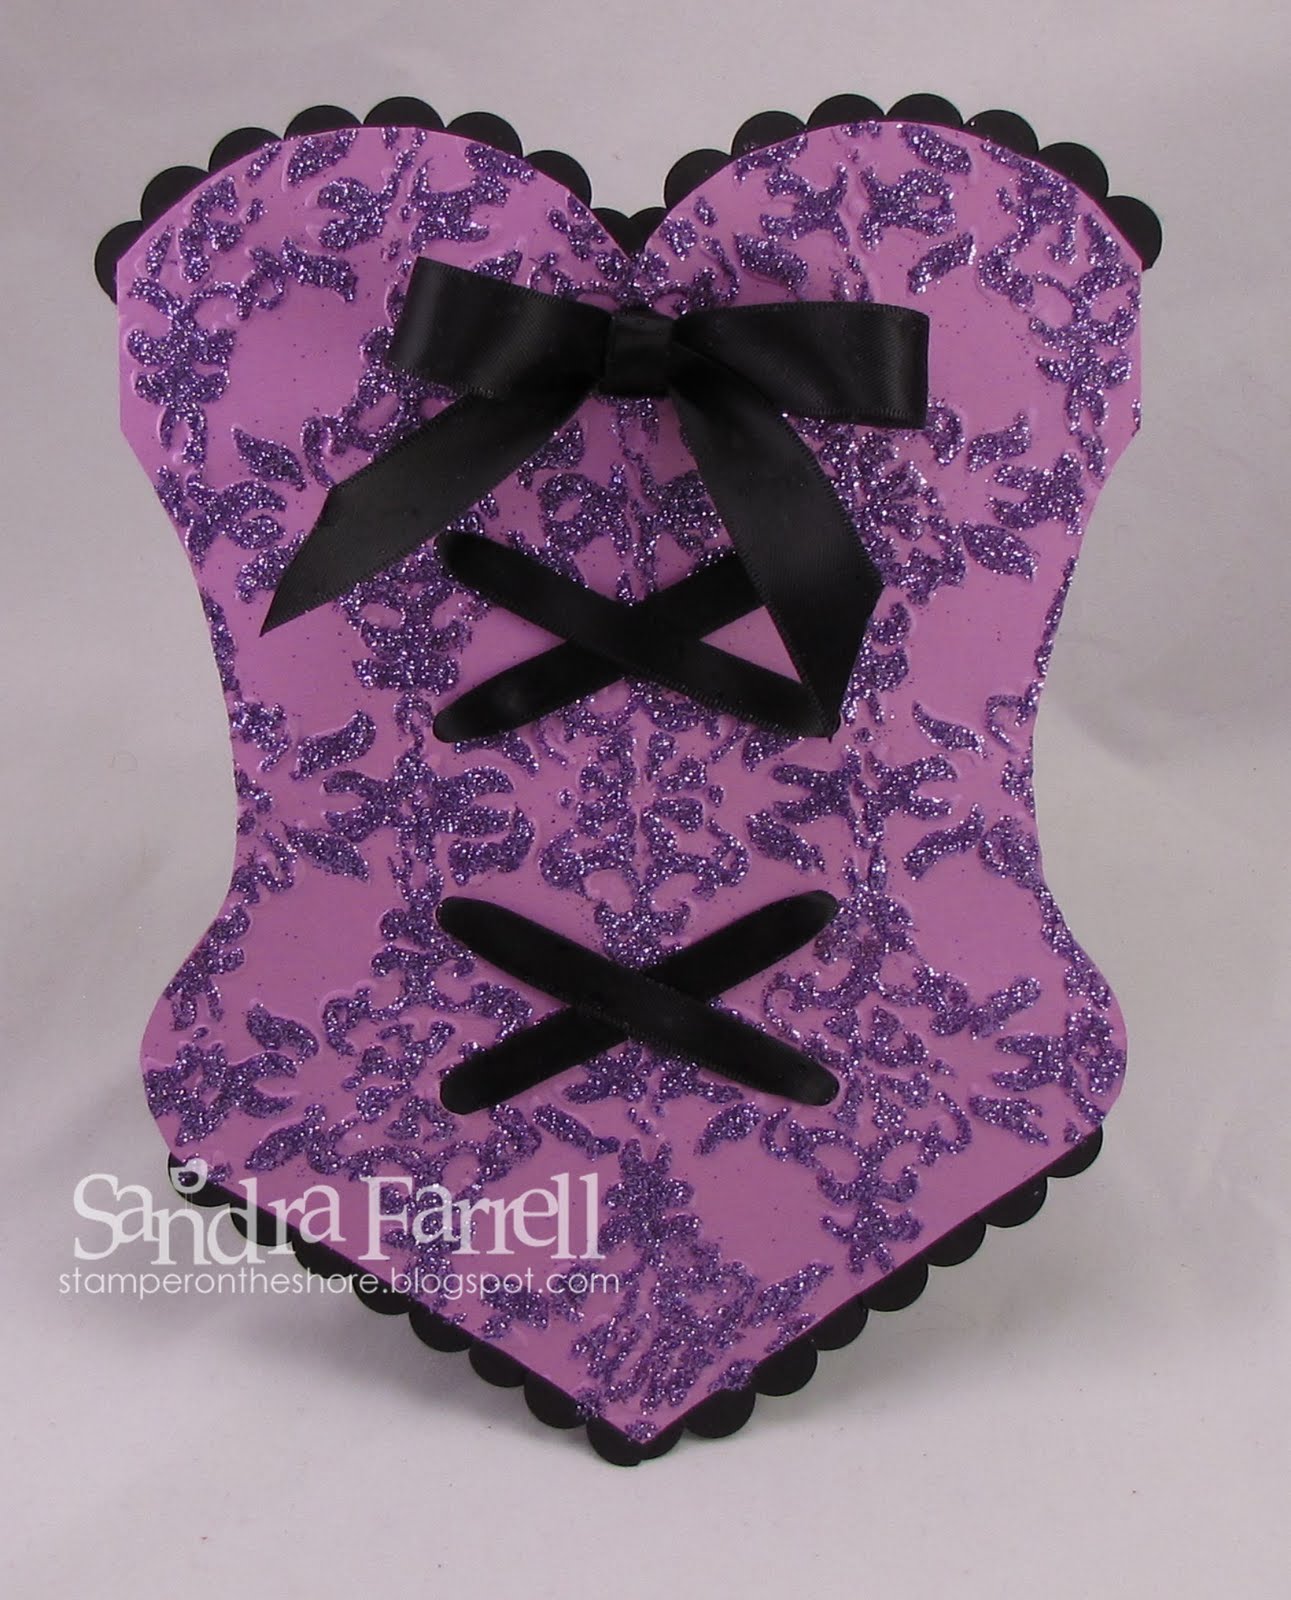
Now I have seen variations of this card over the years, but wound up making my own template. First I googled 'cards bustier' and got a wonderful You Tube video which showcased a bustier card. Then I got out my paper and came up with my own template. Then I ran it through my Big Shot with the Vintage Wallpaper Textured Impressions folder. Once that was done I used a two way glue pen to add the glitter to the embossed image - it isn't perfect, but I like the effect. The glitter is from my stash.
 I punched the holes with the crop-a-dile. Then I got out some Basic Black Satin ribbon and folded it in half. I used sticky tape to hold it in half. Next I threaded it through the holds and secured it on the back with more sticky tape. The top ribbon was not folded in half, and tied into a bow.
The lacy trim was made using the largest scallop circle punch. I then cut out the middle, and unrolled it to make this lacy edge - tutorial to be posted soon. In fact, maybe I'll get organized enough to post up one for the whole card - we'll see...
Finally I made a smaller cut out of the shape and formed a pocket to slip in this gift card. Here's the final image.
Friday, June 3, 2011
Bunny Hat Fun!


I sat down yesterday feeling inspired to create. I really wanted to use my new paisley petals DSP, so I started looking for a sketch. When I came upon this week's sketch at Create with Connie and Mary, I decided it looked like a scrapbook layout, so then I pulled out this photo of my kids taken this past Easter. Well, then I thought, that perhaps, some pastel colours would be really apropriate. The strips on the left were made using My Digital Studio. The nice thing about this is that I used the align tool in MDS to made sure I got a perfectly spaced pattern with each stamp.
Wednesday, June 1, 2011
Stampin Royalty Challenge #74

I am horribly late with my posts this week. My apologies. It's been a crazy week - what can I say? This week we have a fabulous colour challenge for you at Stampin' Royalty Click here to check out the fabulous samples made by the design team. This week I pulled out a soon-to-be retired hostess set - Birthday Bakery. It's the first time I used this set, but I definitely will using it again. It's so darned cute! In fact, one I had stamped out all the images I decided that I needed to make 2 more cards in order to use them all up.


Subscribe to:
Posts (Atom)