

Saturday, December 31, 2011
Happy New Year!!!
Friday, December 30, 2011
Cardinal Christmas

I pulled out this set and decided to do a bit of colouring. I used a blender pen and an ink pad. when I was finished I spritzed it with the Colour Spritzer tool. The background paper was embossed with the Big Shot for more texture.

Thursday, December 29, 2011
More Masking

Ahhhh Christmas is over. I have a few final Christmas cards to post up in the next few days. Hopefully I'll get them all in before New Years!

This card is another one of my Smooch Spritz masking technique cards. Click here or here to see previous cards using this technique. You'll find more details about how I did it there too. This is another hybrid card which I made with My Digital Studio.
Wednesday, December 28, 2011
Stampin' Royalty Challenge #104

 Yes, you don't need to rub your eyes and look again, it's a Valentine's Card. This week at Stampin' Royalty we have a colour challenge. These colours really said Valentine's Day to me. Besides, Christmas is over right? There are a few soon-to-be-retired items on this card. Firstly the Stamp Set "You are Loved" is in the Holiday Mini. I really hope that it turns up again in next year's catalogue. This is the first time I have inked it up.
And the Designer Velvet Ribbon in Very Vanilla is going too. I have to say that I'm a bit sad that I didn't use very much of it. But it was a natural addition to this card.


Tuesday, December 27, 2011
Colour Q Challenge #117

This week at Colour Q we have a slightly different challenge for you. Black and White and any colour of your choice. Well, I knew I wanted to add purple. Plus we had this cute photo taken last week and I found this paper to match Teagan's dress exactly. The purple DSP is from the Cheerful Treat DSP (digital, of course). I added the snowflake stamps and reduced their opacity to 50%. Then I added some satin ribbon in Basic Black and topped off the bow with an Antique Brad.

Monday, December 26, 2011
Joy at Christmas

Here's a card that I started over a year ago. I stamped the poinsettia image from Bells and Boughs on watercolour paper and coloured them in with a blender pen and ink pads. Then i spritzed with Crumb Cake marker and the Colour Spritzer Tool.

Sunday, December 25, 2011
JOYEUX NOEL

Or as they say in English "Merry Christmas". I hope that you all woke up to a fun-filled morning, especially if you have young children like I do.

Believe it or not, this is a hybrid card that I whipped up 13 copies of in under an hour. I made it for a swap a few months ago. I layered up several of the embellishments from the Very Merry Twenty-Five digital kit. The background paper is from the Frostwood Lodge DSP. (digital version of course) I cut out the circles using the Circle Scissor Plus. I used the quited sating Cherry Cobbler ribbon and Dazzling Diamonds to add some interest. They were popped up with dimensionals as well.

Saturday, December 24, 2011
Happy Christmas Eve!!
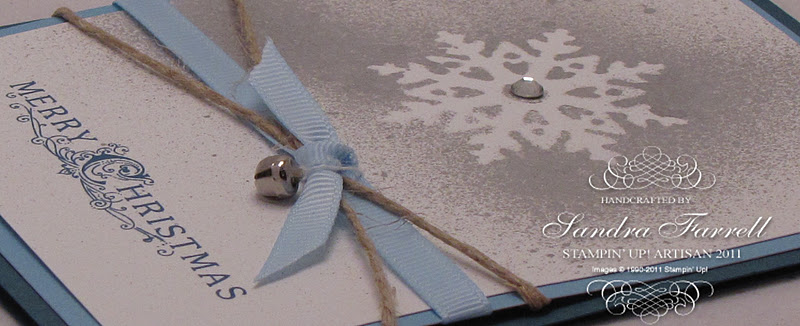
Happy Christmas Eve Everyone!!! I hope that Santa comes to all of you who believe in the Spirit of Christmas this year. Today I am sharing with you another of the cards that I smooch spritzed last month.

This card was mounted on Marina Mist cardstock and then mounted again on Night of Navy.
I used some bashful blue gosgrain and some hemp twine to add some detail and then added the jingle bell for that finishing touch.

Thursday, December 22, 2011
Christmas Spritz
 I am finally back in the swing of crafting. It feels good to be creating a bit again. Over the next few days I will be posting several different cards that I made using the masking technique and Smooch Spritz. First I created the sentiment on My Digital Studio and printed it out. Then I trimmed the cardstock so that it was the appropriate size. Then I took a shape that I die cut from the Northern Frost Sizzlit Decorative Strip Die. I used a bit of dotto to secure the snowflake and then sprayed the smooch over it. Then I quickly removed the snowflake. When the Smooch Spritz was dry, I used the Adhesive Eraser to remove any extra that was stuck on. I let these pieces of spritzed paper sit for over a month. I just couldn't find any time to finish the cards.
 But anyway, I digress... next I decided that the simple white cardstock needed something to jazz it up, so I pulled out my new Lucky Limeade orgazna ribbon from the upcoming Sale-a-bration catty. I really love how delicate and versatile this ribbon is. So I wrapped it around the cardstock and then added the bow. I attached it together with some Luckey Limeade bakers twine and one of the adorable jingle bells in the current Holiday Mini. Then I added the Basic Jewel Rhinestone to the centre of the snowflake. Finally I mounted it on Cherry Cobbler and then again on Old Olive cardstock
Wednesday, December 21, 2011
Stampin' Royalty Challenge #103

Well I'm back in the saddle, two posts on two days in a row - kinda amazing right? This week over at Stampin' Royalty we have a theme challenge for you. The theme is, of course, CHRISTMAS!!

I whipped up this card very quickly (well in my brain, the planning went really quick) but, in actuality, it took a few days as I really glued that rosette and it needed to dry properly. I'm a bit bummed because all the photos I took of it make the circle in the middle look off-centre, and it's actually straight in real life, but now I've given the card to Teagan's daycare, so I can't really ask for it back now, can I? This was super easy to make though. The rosette and the background paper are from the 'letters to Santa' DSP which is NOT retiring soon as it's in the main Catalogue. I used the tea stain and the mahogany inks from the distressing kit to sponge the edges for a more vintage feel.

Tuesday, December 20, 2011
Colour Q Challenge #116

 So I think I have recovered from the mudslide in our front yard (see my last post if you don't know what I'm talking about.) And now that school's out and I've had a few nights of good sleep, I'm ready to start crafting again. This week is a fabulous Christmasy Colour Combo over at Colour Q. I really enjoyed this challenge. Of course I'm trying to use up all my felt embellishments from the current Holiday Mini so I substituted Garden Green for Glorious Green. Besides, all of my retired SU product was destroyed in the flood last month, so I don't even have the Glorious Green ink pad left.
 This card was really fun to make though. I had fun distressing and sponging and smooch spritzing to make all the details. The ribbon and the baker's twine are both Lucky Limeade, and they're in the upcoming Sale-a-bration, and Occasions Minis which will be available for purchase in two weeks! And aren't those little mittens absolutely adorable???
 The sentiment is a soon to be retired hostess set from the current Holiday Mini. I stamped it in two colours, and then cut out the words and adhered them over the other image. Then I cut the entire thing out very carefully.
 Tuesday, December 13, 2011
The state of my home now...
 Well, I haven't done a lot of crafting these days. Remember that flood in my crafting room, here's how it's getting fixed. Here's a little look at what my home, or at least my yard is like these days. This is a photo of my front yard
 Ah yes, and here is my driveway. It's so easy to start your frozen car in the winter when it's parked on the street! (sorry for the sarcasm) I'll post some photos of my crafting room in the next few days.
The good news is that only 3 more days of work and then I'll have time to get back to my design team duties and all that entails. I can't wait to sit down and do some crafting.
Saturday, December 10, 2011
Stampin' Up! Facebook Project


This is the actual photo they posted on facebook. I had to digitally alter the background to remove the stocking banner as it was too busy a background. That's why the photo looks so fake. The top photo was taken in my light box, so it's a better photo, but I couldn't fit the entire forest of trees in there. But check out the top photo for a closer look at the details.
 I traced out a cone pattern onto some retired cardstock and made a template. Then I traced each template again, and then altered them to be smaller. So I think I used around 5 sizes of cone. I used the Red Glimmer and the Silver Glimmer paper with the Letters to Santa DSP. Once I had assembled the entire thing, I decided it needed more bling, so I coated the DSP with Tombo glue using a paintbrush, and then dumped glitter all over them. It sure made a mess.
 I wound up covered in glitter. Each cone was topped with a little flag. I used the 25 and counting stamp set from the current mini, and I stamped them all in Early Espresso on Whisper White Card Stock. Then I punched them out with the 1" square punch and mounted them on a shape punched with the postage stamp punch. I used my scraps from this project for these postage stamp shapes. So they are a variety of colours. I mounted them each on a strip of Early Espresso cardstock, and then inserted it into the top of the cone and glued it down inside. I originally found this idea on the webiste eighteen25.com
Friday, December 2, 2011
Redecorating my crafting room
Last week I posted briefly about a flood in our basement. Well last week we had a few wet puddles in the corners. The drain tile work started on monday, but Sunday morning we woke up to this...

Nope, that's not a shiny laminate floor in my crafting room - it's 2 inches of water through my entire house!!!


Ah well, I have now taken over the dining room for the forseable future and let the family know that our traditional Christmas Day brunch is probably not happening. I can't imagine entertaining 30 people with all the stuff from the basement being stored all over the living space upstairs. But anyway, the bright side is that I will be getting a new crafting space - I can't wait for that!
Wednesday, November 30, 2011
Stampin' Royalty Challenge #100

I can't believe it's been 100 challenges for Stampin' Royalty. I remember when we were all trying to put this challenge blog together. It was about this time 2 years ago. We were trying to come up with a name, trying to design the blog template, and trying to decide when we would start our first post. And as you probably all know, getting a group of women to agree on something is sometimes a bit of a challenge. But we had a lot of laughs along the way. We launched the first week of January 2010. It's been tons of fun for me. Angela and I are the only original design team members left, but we've been joined by some fabulous designers along the way. I'm so happy to be a part of this, and I'm so happy that we have Georgeann running the show these days. She gets it all organized, and keeps us all on track. :)
 This page might look familiar to you, if you checked out my blog yesterday. Click here to check out that post. You are NOT seeing double, I really did make two copies of this page. The page started out as a vintage inspired colour challenge for the Colour Q but I could not decided on which page I liked better. So I chose one to give to Colour Q for yesterday, and the other is for Stampin' Royalty today. This fits well as this week's challenge is ANYTHING BUT A CARD
So, why not a scrapbook page??
Mixing up the colours like this gives the page more of a vintage feel. If you zoom in on the date, you will see how this type has a bit of a worn look. I love it.
Tuesday, November 29, 2011
Colour Q Challenge #113
 When I saw this combo I knew I had to participate this week. I love the subtle difference with the tones of blue, and I really love the colour blue in general (well, not as much as purple, but almost) Blue made me think of the ocean, so I decided to scrap this photo I took of my kids. They are sitting on the bow of the boat, as we head in to dock it at the end of the day. This photo looks fantastic in colour as well. I love how you can see the mountains, and the blue, blue sky.
Friday, November 25, 2011
My Project is Up on Craft Project Central (and a FREEBIE)
I must apologize for neglecting my blog. Besides the crazy lifestyle I lead being a full time mother, wife, and Grade 2 Teacher, I also have 2 blogs, I'm on 2 design teams, and I have a life as a Stampin' Up! demonstrator. So all of that aside, I'm furiously trying to complete 24 projects for the display boards at Leadership which need to be in Salt Lake City by December 15th.
With all that on my plate, I decided to join a gym and try to loose some weight. I've been going for a month now and trying to take it easy as I haven't been in many years. Well,I woke up last week and couldn't get out of bed one day. My back completely seized up. Yup, I pushed myself too hard. I was laid up for over a week, but today I managed an entire day at work. YAY!
To top all of that off, we're right in the middle of having new windows installed (remember I live in Canada and it's almost December) and yesterday we discovered that our basement has flooded so we need new drain tiles - argh!
But enough complaining, let's just say the next month is going to be a challenge as far as stamping and blogging goes. Now how about something fun!!!

My project is up at Craft Project Central. Hop on over and sign up to get copies of not only my tutorial above, but a whole month's worth of tutorials. Below are a few close-up photos of the details. Scroll all the way down to get your own copy of the subway art for FREE


Below is my free subway art which is in the photo above. You can click on the photo to download it as a jpeg, or you can download it by clicking here. As you can probably see, the colours match the photo above.

Subscribe to:
Posts (Atom)